
|
Update 1/3/2012: This page discusses using Paragon Drive Backup version 8.5, instead you should look at my discussion of Paragon Hard Disk Manager 2011 In my discussion of Complete System Backup I recommended using a stand-alone program that creates a complete backup of your C drive which can be easily restored to a newly formatted hard drive when your C drive fails or becomes hopelessly corrupted by a virus. You notice I said WHEN, not IF, because sooner or later it's going to happen to you. One program I've been using is Paragon Drive Backup. It may not be the best, but I've tested it and know I can easily restore my backups should the need arise. In Complete System Backup, you'll see I discuss some features it doesn't have that I would like. I did test the Acronis product which has been recommended to me, but with the stand-alone version I tested I could not restore the backup. What good is a backup if you can't restore it? As I said, I use the stand-alone version of Paragon. You can only get this version if you buy and install the Windows version. In that version there is an option to download the stand-alone version. Download it, and when you run it, it will create a bootable CD with the stand-alone version. I use the stand-alone version because you will occasionally have trouble with any backup created while Windows is running. The problem is that other processes can start-up while Windows is running and potentially mess up the backup. The biggest complaint people have with Paragon is that it's not that easy to use. And they're right, but don't be afraid, hopefully these "screen shots" (actual pictures of the screen ... since it's stand-alone, one can't use screen capture) will get you going. Recommendation 1 (not followed in example below): Before starting be sure there is a folder at the top level of each of your drives that uniquely identifies the drive. Name this folder so it sorts near the top. I now labeled my external drives with different colors it easy to tell them apart at a glance, see Labelling Your External Drives. On my internal drives I now create a folder with a name like #Name-D2TB (where Name is the name of the machine, D is the drive letter and I follow this by the size of the drive ... but don't use something like 1.5T to indicate a one and a half TB drive ... some program, I think Paragon, can't deal with the period in the folder name). Recommendation 2 (followed below): Before starting create a folder where you're going to put the backup. Create this folder in a standard place; either in the folder described above which identifies the drive (in the example below I created the this folder in folder named "zBackup", but this doesn't sort to the top making it easy to reach with Paragon, nor does it identify the drive the folder is on). Name the folder based on the name of the computer and the date of the backup. For example, one of my desktop computers is named "Mercury", so to backup its C drive I might create a folder named "Mercury-C080922" (dates in the YYMMDD format sort correctly alphabetically). |
Sponsored Advertisements:
|
Put the stand-alone CD in your CD drive and reboot your system. Assuming you're going to backup to an external hard drive, make sure it's attached and running before rebooting. If your machines boots from the CD you'll see the screen below. If it doesn't boot from the CD, you'll have hit the key during boot which causes your machine to enter "Setup" (often this key is the Delete key, but it varies from machine to machine). In the CMOS setup change the "boot order" so it boots from the CD first (it will only boot from a CD if the one in the drive is bootable, most aren't so leaving other CDs in the drive won't cause problems in the future).
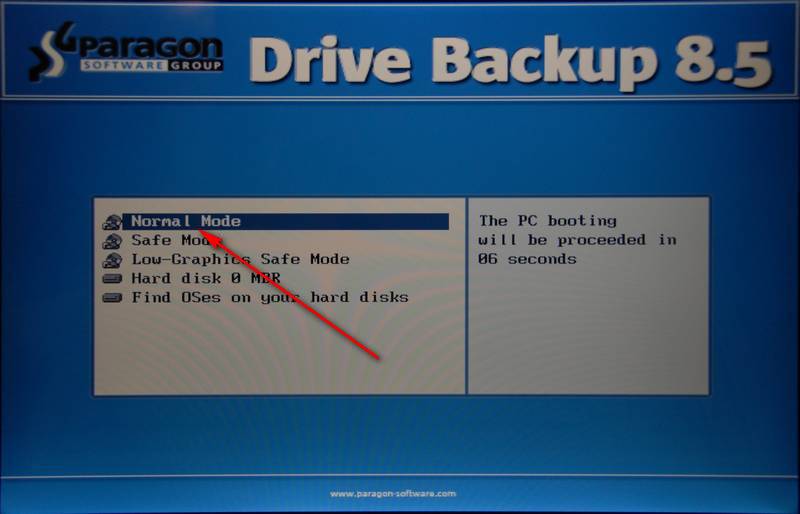
As your system boots from the CD, there's a question about what you want to run. You can either choose "Normal Mode" or wait a few extra seconds and it will continue on automatically until you get this screen:
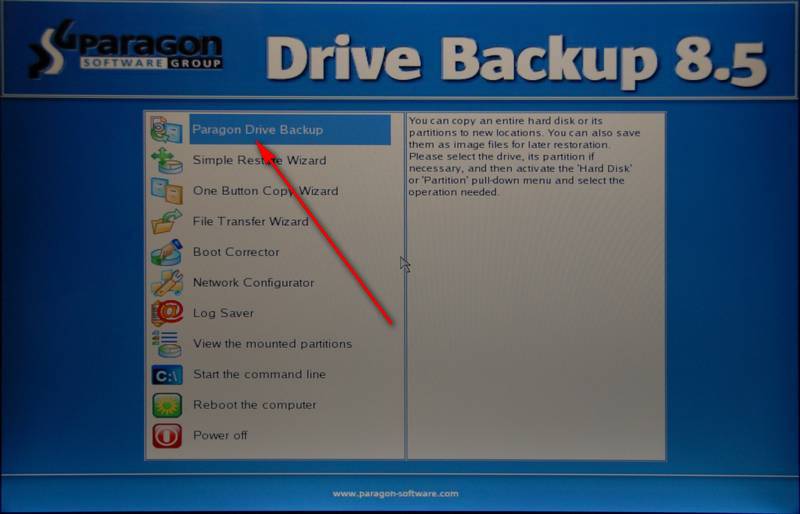
Choose ... "Paragon Drive Backup" and you'll see a graphical summary of the drives (and partitions) on your system:
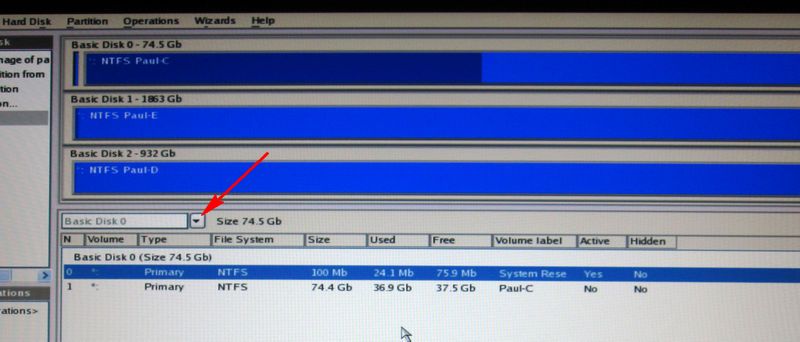
NOTE: If you see no drives listed (on the screen above 3 drives are shown: Basic disk 1, 2 and 3) it means your motherboard is too advanced for your version of Paragon and you ALWAYS need to boot in "Safe Mode" (that option is shown 3 screens above).
The first trick is to select what you want to backup; sometimes it's not totally obvious.
You want to backup the system hard-drive including, if possible, all partitions on it. When Paragon starts it assumes you want to backup "Basic Disk 0" ... if this isn't your system drive you need to change it. The biggest clue you have is the size of the drive, if you know the size of your system drive and the size is unique, just make sure a drive of that size is shown to the right of the pull-down. If it's not you need to change it.
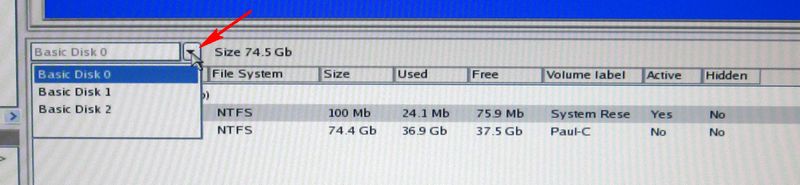
If you can use your mouse it's easy, just click on the down-arrow (red arrow) and choose the system disk. If you can't use your mouse it gets a lot more challenging. (In Safe Mode not all motherboard/mouse combinations allow the use of the mouse.) Keep pressing the TAB key until the down-arrow (red arrow) turns yellow and then use the down-arrow KEY to choose the system disk.
Once your system drive is selected you can use the Ctrl-B shortcut, or the menus to backup the entire drive:

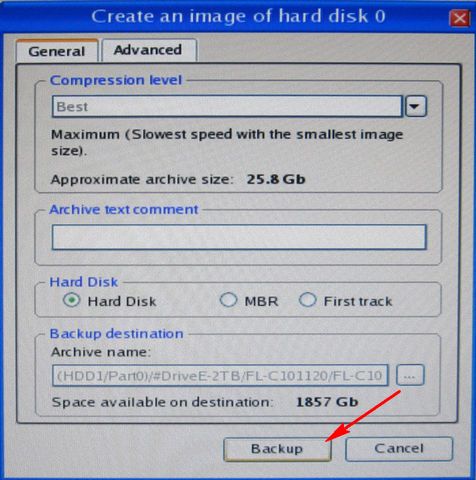
On the Create Backup menu, you'll want to change the Compression Level and specify a location and name for the backup files:
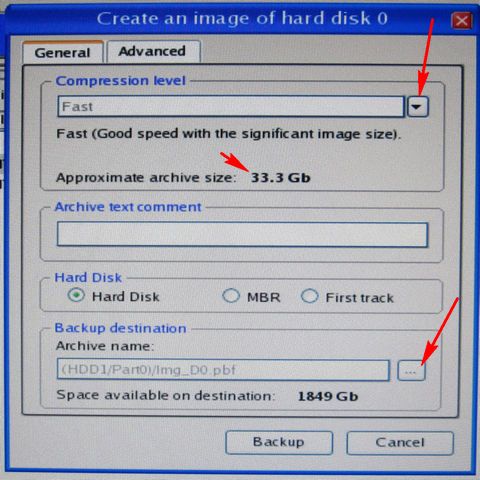
For compression I normally choose "Best". The exception is if I'm first doing a backup that includes Shadow Files (all the hidden files which "System Protection" keeps to allow you to restore your system to the way it was X days ago). In this case I'll use "Normal", make the backup, then turn off System Protection and make another (MUCH smaller) backup using "Best". After a few weeks you can delete the folder with the large backup that includes the shadow files. For more information, see Deleting Shadow Files.
Without a mouse, press TAB until the compression level down-arrow turns yellow, press enter, then use the down arrow keys to choose the compression level.
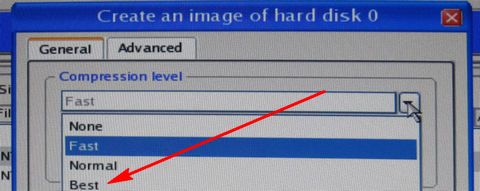
Note that the estimated size with Fast was 33.3 GB, with Best it changes to 25.8 GB (but the actual backup in this case was only 16GB):
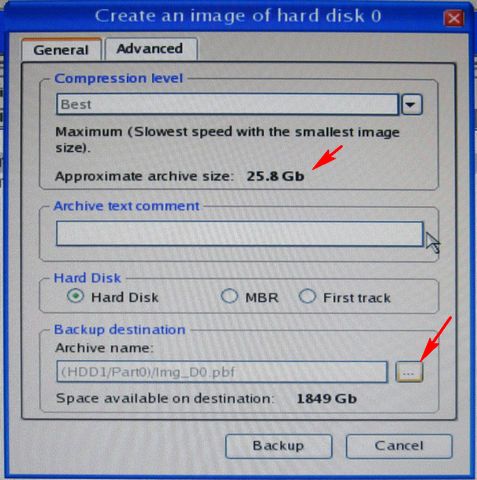
Next choose the backup destination. Without a mouse press TAB until the button with the ellipsis turns yellow (arrow above), then press Enter.
At that point you'll probably see, something like this with no folders listed:
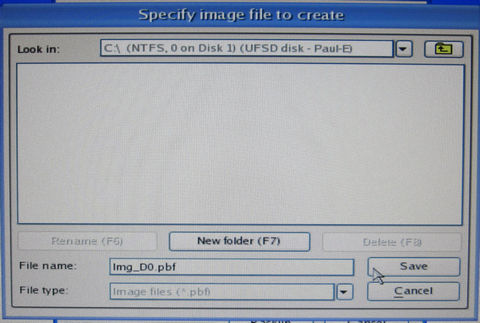
For some reason, especially in Safe Mode, it may take Paragon as long as a minute or two to read and display the contents of the drive. JUST WAIT, finally you'll see something like this:
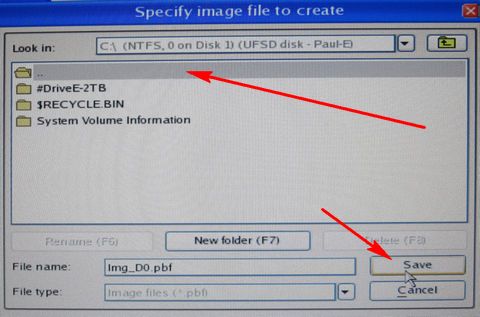
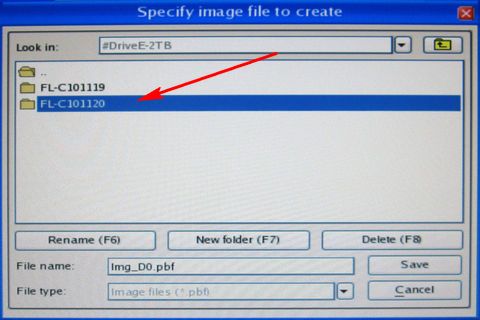
If that's the right drive (it's easy to tell if you put a folder named like I recommended that sorts to the top of the list) you can choose the #DriveE-2TB (in this case) folder by double clicking with the mouse. Without the mouse, you'll notice "Save" is surrounded by yellow, press the TAB key until the line above the list of folders (gray above) turns blue ... at that point you can use the up/down arrow keys to select the folder you want. Once it's highlighted, press Enter to see the contents of that folder.
If you have more than two drives, you may have choose the correct backup drive. Use the "Look in" pull-down:
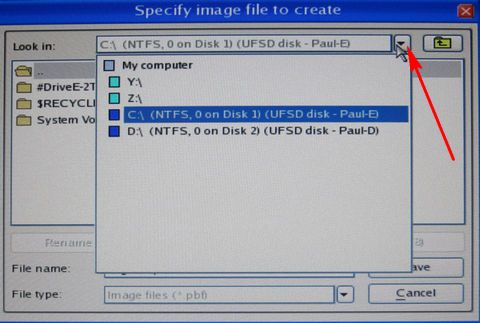
With luck the drive you want will be listed and you can choose it. If not you're going to have to go searching for it, see Paragon Continued.
Once you're in the folder where your backup folders are saved you should see: (Note the name of the folder where your backup folders are stored appears in the "Look in" box, and the folders where the backups are stored should be listed.)
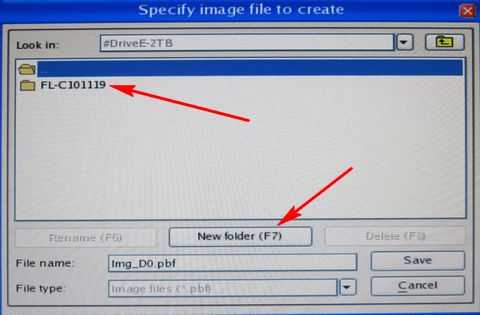
These should be folder names. If you've already created the empty folder for the new backup (which I always forget to do) you can select it. Otherwise click on "New Folder" or use the F7 shortcut to get this menu:
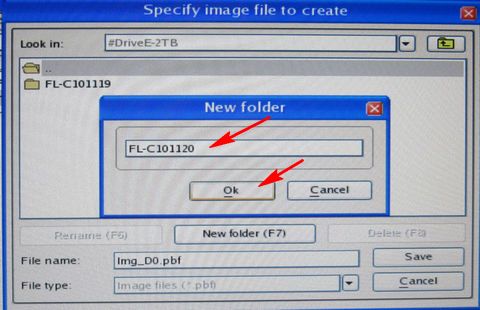
Fill in the name for the new folder and click on OK, or TAB until OK is surrounded in yellow and press Enter.
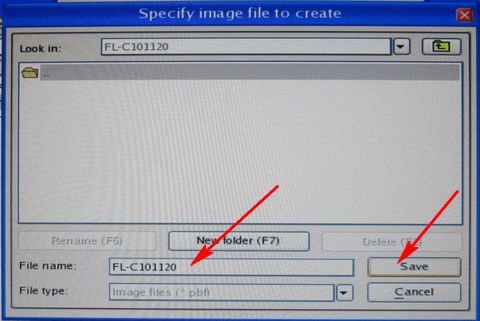
Now the folder exists, but BEWARE, you are not in the folder. Double click on it, or with it highlighted press Enter. You should now see an empty folder with the proper name in the "Look in" box at the top. Once you're there, you can fill in the name for the backup files (I use the same name as the folder in case I screw up and they end up in the folder above). Then click on "Save" or use TAB to surround Save in yellow and press Enter.
At this point you'll be back to the Create menu. Click Backup, or press Enter when the word Backup is surrounded in yellow:
At that point in the bottom left corner of the main menu, the "Apply" button will have turned green. Press it, or use the Ctrl-A shortcut.
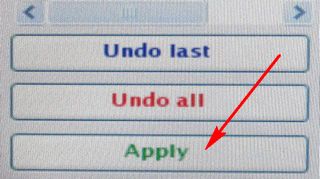
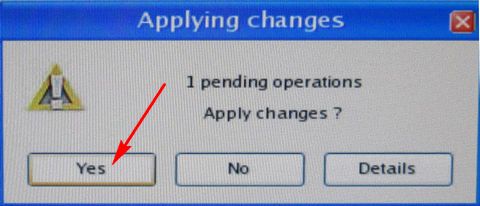
You will then get this confirmation box. Yes is surrounded in yellow so you can just press Enter, or click on it:
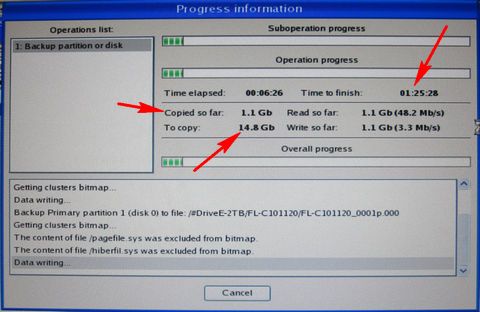
At that point your backup starts. It can take several hours to complete, especially if you have included shadow files or are also storing data on your system drive. After a few minutes it will show the estimated time to completion, the amount it has already copied and the amount still to copy (after compressing):
That's all there is to it unless you need help finding individual partitions (because it can't backup the entire drive) or you need help finding backup drive. In those cases, see Paragon Continued.
Suggested next choices:
ImagingTips.com Site Map
[an error occurred while processing this directive]