
Paragon Stand-Alone Backup (Summary)
by Wren McMains
(Updated 11/29/2015)
- Make sure you have a folder that sorts near the top of EACH drive that uniquely identifies the drive (and put your backups in one of these folders).
- If your machine is running fine, delete the shadow files created by System Protection. This will make your backup smaller and take less time to create. Right-click on Computer, choose "Properties", then "System Protection", select your C drive and click "Configure". Click on the Delete button. Unlike earlier techniques, this leaves System Protection turned on ... since I kept forgetting to turn it back on this is much better. If you've done it correctly "Current Usage" should now read 0 bytes.
- Insert your Paragon Recovery disc and boot from it. You know you're booting from it if it takes about THREE MINUTES for Windows to start. If Windows boots from the hard drive instead of the disc, modify you CMOS settings, changing the boot order so your machine always boots from a bootable CD if it finds one.
- You know you're in the right place if it finally says "Paragon Hard Disk Manager".
- Choose "Backup" on the top left. Note: I've seen machines on which Paragon seems to get stuck on one or more of these steps ... if this happens just wait 5 or 10 minutes. No idea what causes this, something about the hardware on the particular machine. If this happens one your machine, it will happen every time.
- You should see the Welcome screen. Click on Next.
- Choose "Disks or Partitions", click Next.
-
Find your System (C) Drive. It's not always listed first and Paragon may associate a drive letter other than (C:) with it. Double check that it's the right size and you've picked the one with the right volume label. Don't count on it being first on your machine.
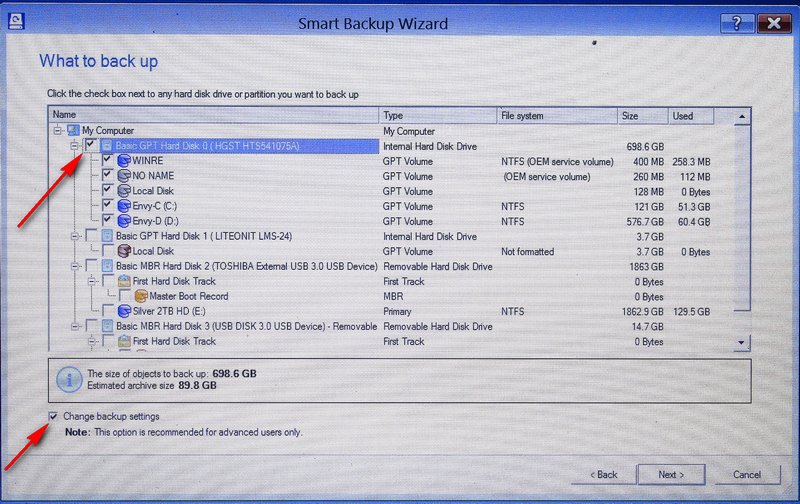
- Check the little box next to the drive itself, not one of the partitions (arrow above).
- Also check the "Change Backup Settings" box (second arrow above) before clicking Next.
- Screen should now be titled Advanced Backup Settings/Backup image options. In the pull-down for Compression level where it says "Normal compression", choose "Best compression", then click Next
- Choose "Save data to local/network drives", then click Next
- Now you need to choose where to put the backup. Assuming the volume labels on your drives identify your drives, rely on them, not on the drive letters Paragon assigns. Click on the little + sign next to the drive where you want to put your backup.
- If you've chosen the right drive you should see the correct folder name for the drive where you want to put your backup (step 1 above).
- Highlight this folder. In addition to highlighting, also click on the + sign next to it so you can see the backups already there and how you named them. Don't forget to leave the folder for the backups (not one of the individual backups) highlighted.
- Change the name assigned to the backup. I use names like "Laptop-C120424". The first part of the name identifies the machine, then the C says it's a backup of the C drive, and then comes the date in YYMMDD order (so later the backups will sort correctly). Then click Next.
- If appropriate describe the backup (before/after Windows Update, etc.), and click Next.
- It will show you a summary of what it's about to do. Click Next.
- If only your operating system is on the C drive it should finish in 10-20 minutes. If all your data is also on the drive you're backing up, it may take hours.
- When finished click Done.
- Eject CD
- Click Restart
- After rebooting, look at the drive where you put the backup. It should be in the folder at the top of the drive in a folder with the name you assigned to the backup ... if it's not you can move it into the proper folder. To find the actual size of the backup right click on the folder with the backup and choose Properties.
Suggested next choices:
ImagingTips.com Site Map
[an error occurred while processing this directive]