
Quick Incremental Backups
Using FreeFileSync
by Wren McMains
(07/24/2018, updated 04/02/2021)
The hard drive on your computer contains your personal documents and pictures, it IS GOING TO FAIL, it's just a question of when. To avoid loosing them when it happens you need to make frequent incremental backups. Because they're incremental (you only backup files that are new or have changed) the backups are very quick so you should do them frequently. I recommend at least weekly as well as just after downloading new pictures from a camera (before you format the camera card).
For 12 or more years I had been using a Microsoft program called SyncToy. In 2018 I started using FreeFileSync which has many advantages (see the link at the bottom for the reasons I like it). Here's a quick tutorial on the basics.
|
Installing FreeFileSync
Go to the FreeFileSync Download page, but be careful, see below ...
FreeFileSync Download
Be careful, sometimes there ads on the page with big buttons that look like you should click on them ... you DO NOT want to go down that path. Instead click where it says "Download FreeFileSync ##.# Windows":

That will download the current version of the FreeFileSync Windows Setup program. Run it to do the install.
Changing Letter Assigned to External HD
When backing up to an external hard drive (HD) I still recommend changing the letter assigned to that particular HD when it's plugged it. If you don't, Windows assigns letters as various things are plugged in and might not be the same the next time you want to update the backup. It is possible to change it later using FreeFileSync, unlike with SyncToy, but I still recommend giving it its own unique letter.
See Changing Drive Letters for details, but the quick version is: WinKey+X, choose "Disk Management", find you drive on the bottom half of the screen and right-click on it, choose "Change Drive Letter and Paths ...", click on the Change button, using the pull-down choose the new letter, click on OK, it will give you a warning that some programs may not work if you do, click on Yes, continue anyway. That's all there is to it. X might be a good letter for an eXternal HD.
Basic FreeFileSync Usage
-
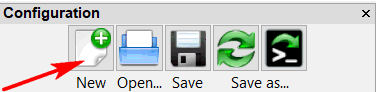
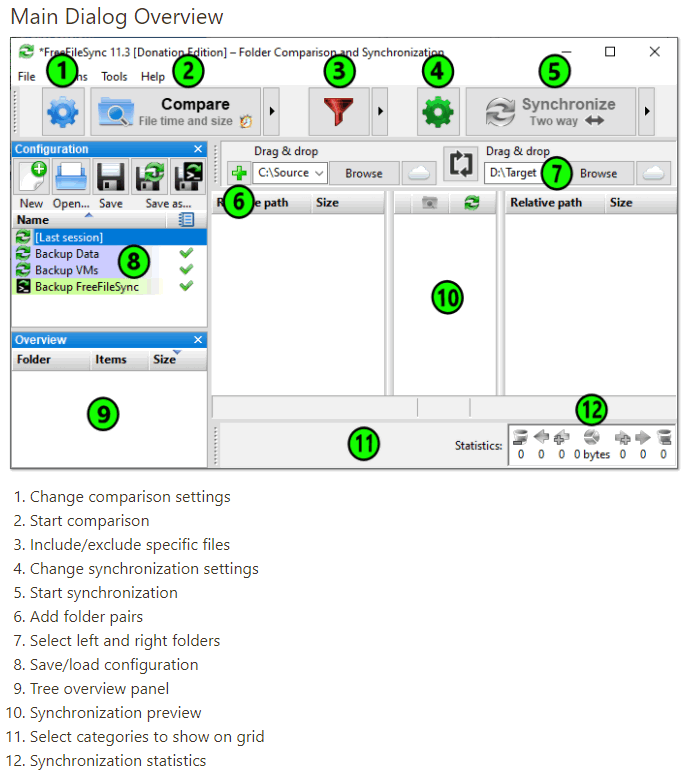
If there are no folders specified under where it says "Drag & Drop" select both the left and right hand folders (the folder pair) by using the two Browse buttons, or by dragging and dropping the folders. This example shows backing up ALL your Documents, Pictures, and other personal data stored under your Users folder on the C drive. If folders are already specified and you want to define a new backup, Press the New button.
>
- Next press on the Filter button (the Red funnel in the center) to exclude any files or folders from the backup. By default FFS fills in 5 things you always want to exclude. If you are backing up your entire Users directory you'll also want to add the two lines highlighted in yellow ... this will avoid all kinds of error messages by excluding files that Windows always has open, and therefore, can't be copied.

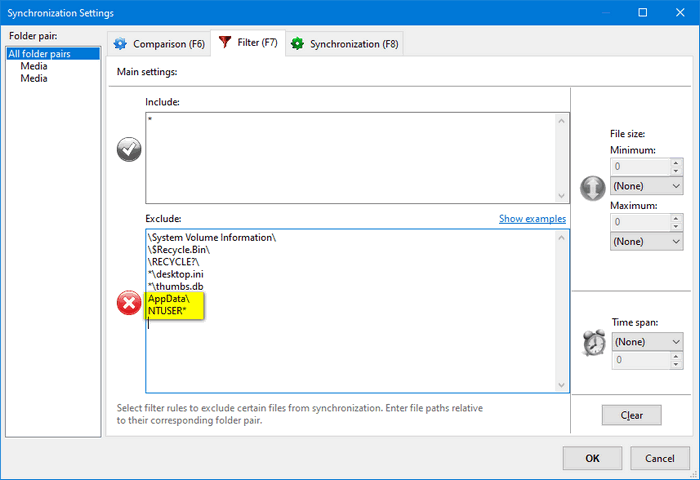 If you modify the filter after running the Compare and before Synchronize, FreeFileSync will instantly show you how the backup will change as soon as you press OK on the Filter dialog.
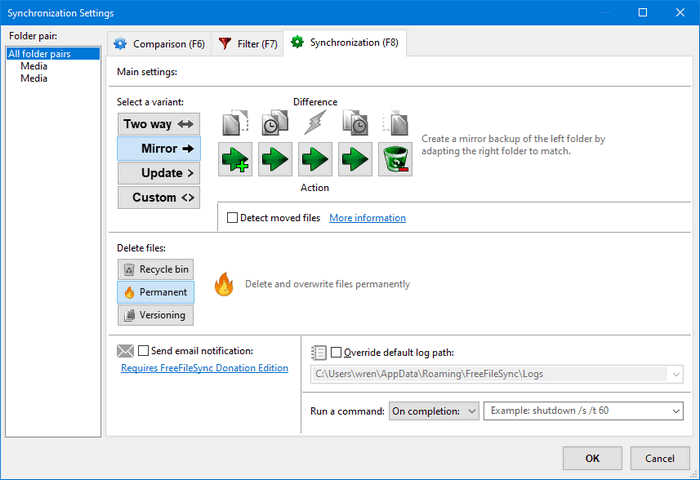
- Select the synchronization settings by clicking on the Green gear to the left of the Synchronize button. That will give you this dialog box where you can click on each variant (Two-way, Mirror, Update, and Custom) to see what it does. I recommend Mirror if you are backing up to an external drive and "<- Two Way ->" when backing up to a drive on another computer:
- Press the Compare button to see what will happen during the backup (same as the Preview button in SyncToy):
- When you're happy, press the Synchronize button to do the backup.
This overview shows the layout of the FreeFileSync Window, it was found in the FFS manual which you can access from the link below or the Help menu in FFS.
FreeFileSync Manual
Backing up all your data to an external HD with FreeFileSync
- The first step is to use File Explorer to create an empty folder on your external HD. For the purpose of this example, I called mine Bkup-WrenIT. Above you saw how I used the Browse button the specifiy as the backup folder (on the right-hand side).
- Assuming you're like most Windows users, all your personal data (pictures, documents, etc.) is stored under a folder associated with your <UserName> under the folder C:\Users. Starting with Windows 8, Microsoft started making these folder names a little weird, but they usually still start with at least the first letters of your name. That's the path you use above specifying the folder to be backed up (the one on the left-hand side).
- Before pressing the Compare button be sure to check what the filter (Red funnel) options and the synchronization settings (Green gear).
- Unless it's this is the first time you run the syncronization (in which case thousands of files will be copied from the left to the right. It's important to look at the icons on each line of the preview. If you hover over one with your cursor it will tell you exactly what it's going to do with that file. Examples are shown below.
This may seem complicated, but it's not. All you do is specify where you want to copy from (the left-hand folder), where you want to copy to (right-hand folder), modify the filter if there are files or folders you want to exclude from the backup, save the Configuration settings for the folder pair(s) you just created (save them where you can find them) and run either a Mirror Sync (for external backup) or a Two-way Sync (between computer when files might have been updated on either side). It's really that easy.
But one thing more you should know about are what you see by hovering and clicking on various places in the middle column of the Synchronization Preview:
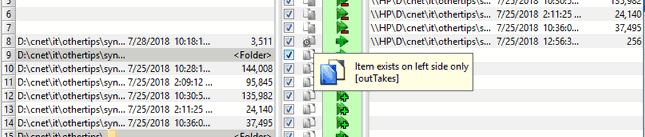
- The changes between the last sync and this one were: 1) Three files were edited (simple green arrows on the first two lines and the 9th) and will be copied to the right (updated in the backup), 2) A sub-directory called outTakes was created and five files were moved into it from the parent folder, and 3) Another folder was created and four files created there:
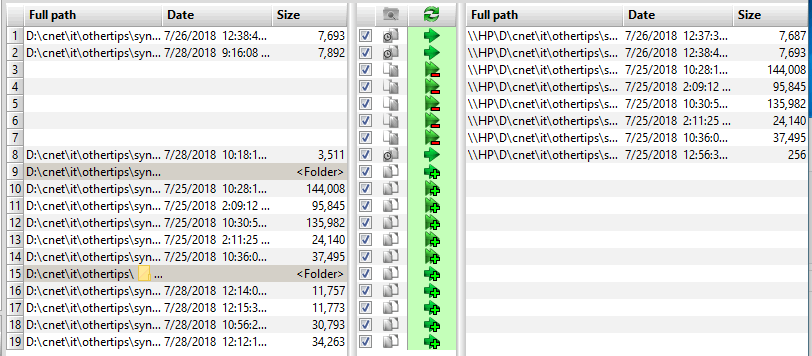
You'll notice that my Preview shows the file sizes and full paths to the files. By default a relative path and no size is shown. I recommend adding the sizes which you can do by right-clicking on the column titles on each side. Relative path may be all you need. To see longer paths make the window wider, or go to full-screen view. You can change the column widths like most places in Windows by left-clicking and dragging on the faint line in the title bar that separates columns.
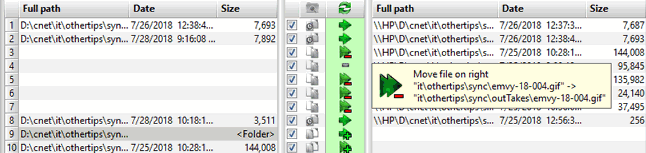
- If we hover over the middle column icon on the 3rd to 7th line we see it says it's going to actually move these file to new folder just like we did on the machine on the left-hand side.
Over the years I learned to trust SyncToy to rename file when they were transferred from one folder to another and not accidently create a second copy on the left-hand machine by copying files back during a two-way sync. Until I get more experience I don't totally trust FFS to do the right thing each time when I'm backing up the same folder pairs to multiple places. If you are using Mirror backup it will never be a problem, and even with two-way syncs it usually does the right thing as you see above.
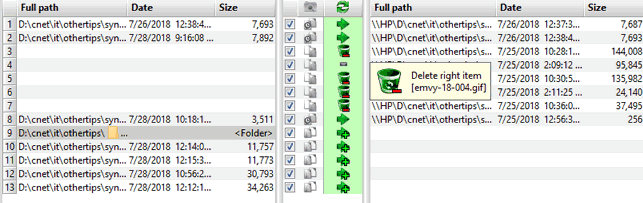
- To the left of the icons in the middle column are check boxes. If you uncheck one of those boxes the action will not be preformed on the corresponding file. Be careful, the line will actually disappear. (Next time you backup it will try again to backup that file.) If you uncheck the box associated with a folder as shown here:
- Not only the line for creating the folder (in this case) but all the lines below it for files in the folder will disappear. And if we now go back and look at the icons for files that were being renamed they have changed to indicate the backup will delete the files from the machine on the right (since they are no longer in that folder on the machine on the left):
There are many things I really like about FFS that are going to make my life a lot easier and my backups much less time-consuming. To learn the details of why I like it click on the first link below. The second link below is the 2018 version of this page, it goes into more details of the error messages generated if you don't modify the filter and the process of fixing them.
Suggested next choices:
ImagingTips.com Site Map
[an error occurred while processing this directive]